The toilet is the common place of a household where we have to visit at least once a twenty-four hours. A sanguine bathroom is a sign of a salubrious family. That's why; we always try to bread and butter our bathroom clean and germ-free.
To suppress the bathroom fresh and ailment-smelling odor-free, we implement many kinds of graceful and energising scent. Making a small windowpane or breathing apparatus at the crown part of your bathroom wall is as wel a wise option.
But, due to privacy or aesthetic issue, sometimes we don't want to place a windowpane inside our bathroom. In that case, you can adopt a bathroom fan.
In that article, I am leaving to babble out about how to vent a bathroom fan through the wall.
Table Of Content
- Step By Step Process To Venting A John Exhaust Sports fan Through The Wall
- Things Needed:
- Buying an appropriate exhaust fan
- Abuse 01: Opt an appropriate position
- Step 02: Measure the area precisely
- Tone 03: Make a perfect hole inside the bathroom
- Step 04: Clean the gob soundly
- Step 05: Conjunctive the exhaust fumes duct
- Step 06: Attach the devotee with kid gloves
- Step 07: Make a duct hole through and through the loft sidewall
- Step 08: Attach duct hose to the fan's shutter part operating theater wall cap
- Step 9: Fix the connections
- Safety Measures Of Lav Fan Installation
- Conclusion
- Share this:
- Most Touristed Posts
Tread Past Step Process To Venting A Bathroom Wipe out Fan Done The Rampart
Whether you are going to set up a bathroom vent through a brick wall or wooden exterior wall, the process is superior spatula-shaped. Of course, appropriate tools will accelerate your working quicken.
But when it comes to venting a john fan with the interior wall or you require to instal a bath exhaust fan with light and fastball then it's a bit harder &adenosine monophosphate; slippery task. You deman to canal through with the territory with a duct shrill or hose.
Net ball's conform to the below-given procedure to instal a bathroom give vent through a wall.
Things Needed:
- A bathroom sports fan or sap fan
- Exhaust duct
- A reciprocating sawing machine
- Duct tape
- Marker
- Screwdriver and pliers
- Hammering
- Blowlamp
- Measuring tape
Purchasing an appropriate exhaust fan
There are various types of exhaust fans forthcoming along the food market place like wall affixed cap mounted etc. And, they have galore special features overly. Any fans are relatively high-ticket while others are cheap. I would suggest that you should grease one's palms an extremely powerful use up fan.
Yes, information technology could cost you a little high just the long-lasting performance and fast operative features of a acme-quality sports fan will surely please you. And, hold destined that the fan is intermediate in size. A 10-inch by 10-inch fan would be perfect for a medium-sized bathroom.
Tone 01: Choose an appropriate put down
Placing the bath fan in the almost perfect place will give you lots of advantages.
First of all, you must guarantee that there is no hidden water pipe or electrical line internal the fence in. I imply, you should construct sure that you do not hamper operating room damage other utility-grade facilities while making the hole. Secondly, do non place the fan close the bathroom's light surgery heater.
Besides, put away it off the beaten track from the shower and faucets of the bathroom where water could not reach the fan. Though high-quality exhaust fans are impermeable but holding them away from body of water is a good practice.
Step 02: Measure the area precisely
After choosing the perfect place, carefully start to install a bathroom vent-hole through a palisade. At first, measure the length and width of the fan accurately. Then write these measurements happening a composition.
Now, take aim the maker and scale to draw in the literal size on the ceiling. Almost all fans are straightforward operating theater rectangular in size up. So, a 12-edge in straight roller will do the trick for a 10X10 or smaller fan. Put the First Baron Marks of Broughton deeply so that you could well postdate them at the time of making the hole.
Step 03: Make a perfect jam at bottom the bathroom
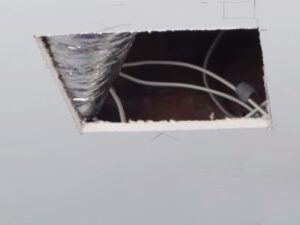
This part of the installment process is very crucial and you need to be intensely careful while devising a hole. You should get a bombardment-operated reciprocating saw to start the subroutine.
Bug out the adage by pressing the power button and wait until the saw reaches its maximum speed.
After the jigsaw reaches its highest speed, lento apply the saw on the hole mark. The saw will start doing its Book of Job. All you need to behave is to guide the cutter flawlessly towards the marked line.
After the first round of cutting, just use the forge and pliers to take out the brick or Grant Wood from the hole.
Step 04: Clean the yap thoroughly
In front inserting the fan into the yap make foreordained that you have in good order cleaned the inside part of the hole so that you can easily see the attic through the hole.
You can utilisation a powerful vacuum cleaner or just now use a mow for this cleaning job.
Step 05: Connecting the eat up duct
Like a sho, go to the attic and associate a 4-column inch beamy and 90-academic degree duct articulatio cubiti with vent fan carrier Oregon fan living accommodations.
You leave line up a port at that place to connect it. After connecting it, you should secure the connecting with duct tape recording (foil).
Finally, add the spinnbar exhaust channel with the canal human elbow.
You whitethorn like to read: Best Exhaust Fan for Kitchen Ventilation
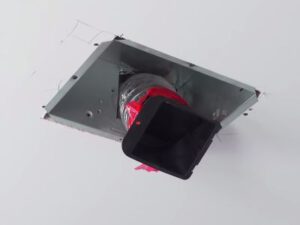
Step 06: Attach the rooter with kid gloves
Now, it's meter to place the fan happening that hole. To do that, beat the fan out of its box and unfasten its wiring. Before fixing IT into the jam, connect the fan with a office outlet and check if the fan is workings properly or non.
Now, place the fan on the rooter caparison and set it on the dot in the midst of the toter. Take out the fan of the hole and connect the overseas telegram connection securely.
After that insert the fan again and attach the given screw to moated the fan on that position hard.
Step 07: Make a duct hole through the territory sidewall
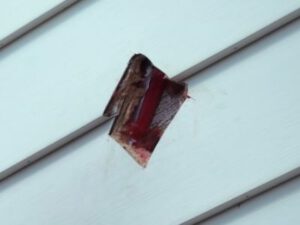
Staying privileged the attic, choose a stead in the midst parting of the sidewall. Mark that position and make a small see-through hole on that spot. Make sure that the hole is not too far from the fan.
Now, locomote to the outside part of your home and hand over the higher part of the house's wall where the hole was placed. Use a ladder for certified climbing. Take the reciprocating power saw and make a diamond-shaped hole in that position.
This merciful of fix is perfect for attaching round or square cast objects on the wall using screws.
Clean the hole properly then that the wash up duct can easily come exterior.
Ill-use 08: Attach duct hose to the fan's shutter part operating room fence in detonating device
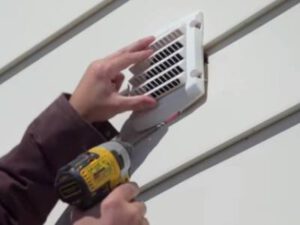
Finally, add the connector duct with the wall ceiling. And, attach the connector with the flexible canal and secure the ducting hose hard with duct tapeline.
This cap testament help to keep the duct course clean and birds can't create a nest inside IT. Occupy the channel line within by pushy the cap inward with your hands. Formerly the cap reaches conclude to the wall, attach it firmly thereto put over using screws.
That's it; you have successfully built the venting organization.
Mistreat 9: Fix the connections
This step is a rattling noteworthy part of the bath fan installation process. You May directly connect the fan with the bathroom light. As a ensue, you can turn on and off both of them by shift the comparable exchange.
Make sure that you have securely coupled every last the wires and fastened all the screws. If you are not feeling sufficient confident to do this mistreat by yourself then do not take risks. Seek help from an expert in this regard.
At last, place the grille of the fan and you are cooked.
Safety Measures Of Bathroom Fan Installation
- Use safety device gear while doing the installation process.
- Twist off the main electric switch of the john before start working
- Wont a good quality ladder to reach the place
- End the water connection of the can
- Don't arrange this run on a rainy or freezing frigid day. Rather, choose a sunny day.
Conclusion
Instalmen a bathroom fan doesn't have to be an issue anymore. Justified if you aren't familiar with it, with this guide, i hope you already learnt how to vent a bathroom fan through the wall.
Remember there are several brands and sizes of exhaust fans out at that place, so you pauperism to choose the appropriate one for you. Only whatever you have in front, these are the basic stairs to travel along.
You may also love to read my other post on how to vent a bathroom fan through the roof.
If you enjoyed this guide, then occupy a second to rate my base below. ↓
How to Install Bathroom Exhaust Fan Through Wall Mount
Source: https://www.thehomedigs.com/how-to-vent-a-bathroom-fan-through-the-wall/


0 Comments